Landscape Blending, and Run-time Virtual Textures

Enable or disable VT on Texture import, Disabled allows for individual assigning of Material attributes,


RVT -Basic Colour, and Normal for height information
Create a RVT Volume

Assign RVT_BC, must be done before bounds can be set (Same is true for RVT_Normal)
Snap to Landscape - TRUE
Eyedrop or choose actor


In master Material for landscape.
RVT Output
Normal into transform vector
World height is Absolute World position
Opacity into constant set to 1

Landscape add array elements within Draw in Virtual Textures
+ RVT normal
+ RVT BC


RVT_Normal - set to World Height
RVT_BC - set to BC, Norm, Roughness, Specular
Material for Mesh blending


Abs World Height - Z Subtracted by RVT Text sample
RVT Sample set too World height
Subtracted - Divide: 10
Divide - Parameter
Value is arbitrary, value is dependent on world size
Saturate


Environment Creation
For this assessment, I was required to create a digital world in Unreal Engine, bringing my initial plans from Term 3 Assessment 2 to life while documenting the creative process applied. This included explaining how I incorporated peer and mentor feedback into the development of my environment design.
1. Select suitable reference imagery of the real world.
2. -.
3. Explain my production processes...
Enabling Tessellation


Config > DefaultEngine.ini
Create and set -
r.Nanite.AllowTessellation=1
r.Nanite.Tessellation=1
Use Cases for Nanite Tessellation
-
Photorealistic Landscapes – Improve terrain detail dynamically
-
Organic Surfaces - Add fine surface bumps without baked models
-
Close-up Cinematic Assets – Enhance characters and props.
-
Virtual Production & LOD Walls – Adjust detail dynamically based on camera distance
Limitations
-
Performance Impact – Increases compute load.
-
LOD Adjustments – Nanite dynamically adjusts tessellated areas.
-
No Full Tessellation Support Yet.


Material Output Node - Enable Tessellation - TRUE

Nanite - TRUE through landscape
Nanite will also need to TRUE through any desired Mesh


Nanite Displacement


Before
After
Start-up Commands
Certain location on the level were causing crashes when approached. the issue didn't turn out to be asset, lighting, or post-processing related, as removal; of these things didn't resolve the crashes.
When using Profile GPU (Ctrl + Shift + , Comma), the issue was reported as "insufficient GPU memory reserved for ray-tracing geometry".
The memory pool for ray-traced geometry was too small, causing the GPU to run out of available memory when streaming assets in the area.
The solution was applied through a console command: “r.RayTracing.ResidentGeometryMemoryPoolSizeInMB”.
Manually executing this command at the start of each session was not reasonable; therefore, start-up commands were required.
Creation of a “DefaultEditorPerProjectUserSettings.ini” was required in Config.
Editor Utility Blueprints were added to initiate the required start-up command.
Once implemented, the issue was fully resolved.
Ideally, the preferred course of action is comprehensive optimisation rather than repeatedly increasing the memory pool size, as continually addressing each occurrence in this manner would compound overall performance costs.


Asset building
Manually creating Blueprint-driven vegetation assets to dress tree meshes, which are subsequently converted into Foliage Static Mesh instances.
This method of creating foliage assets was extraordinarily taxing on performance, as each dressed foliage asset contained thousands of additional polygons

Shack Replacement
In a separate level, I constructed the shack using multiple FAB assets. These were manually placed to create a deliberately gapped structure, allowing light leakage and giving the only warm-toned asset a clear visual presence within the scene.
This was later brought into the main level as a Level Instance, ensuring it introduced no performance issues while remaining easily adjustable.


Replacing placeholder assets


Post-Processing
Enables access to all Lumen-related settings.
Infinite Extent (Unbound) - TRUE ensures the entire scene is affected by the post-process changes, regardless of camera position.
Exposure - Metering Mode set to Manual prevents auto exposure. This avoids the scene brightening or darkening in response to camera movement and improves accuracy when evaluating true light intensity.
Lumen Scene Quality - 2.0 controls overall Lumen quality. Lower values can introduce noise and fireflies, while higher values produce cleaner global illumination and sharper reflections at increased performance cost.
Lumen Scene Detail - 4.0 adjusts how Lumen affects small and distant meshes. Reducing this value can provide meaningful GPU savings with minimal noticeable visual loss.
Final Gather Quality - Higher values to decrease noise within camera view, highly costly for GPU performance.
Reflections and Occlusion
Default - Lumen
Any increase in Quality will also increase GPU costs
Ray Lighting Mode - TRUE - Hit Lighting for Reflection, Evaluates the actual ray hit point, responding more accurately ensuring reflections to match better in main view. Costly for GPU.
Screen Space Ambient Occlusion (SSAO) control - console command
"r.Lumen.ScreenProbeGather.ShortRangeAO 0" or "1" for Lumen
and
"r.Lumen.diffuseindirect.ssao 1" or "0"
SSAO better for GPU - but doesn't generate Photorealistic output.
Individual light set Cast Ray Traced Shadows - Enabled
Lumen Project Settings
Lumen Unreal Engine's default lighting system, best suited to dynamic lighting workflows, delivering high-quality real-time global illumination and reflections.
MegaLights are not required to use Lumen effectively. Instead, they are designed to simplify lighting workflows by allowing extensive use of dynamic lights without constant concern for performance budgets.
Hardware ray tracing does increase quaklity if needed but at the cost of performace


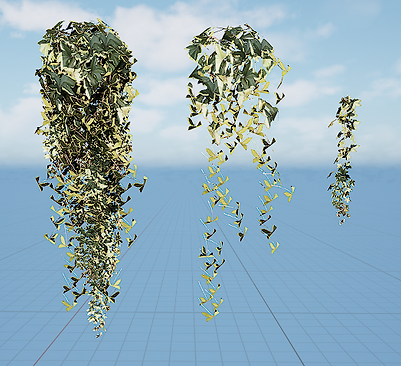
Niagara System - Rain
The rain system was created to reinforce the atmosphere and environmental storytelling of the swamp environment.
Continuous rainfall enhances the sense of dampness, decay, and isolation commonly associated with swamp settings, while also helping to unify lighting, materials, and surface reflections within the scene.


Rain - Emitter
The rain system uses a minimal emitter named rain. Particle generation is controlled through a Spawn Rate module initially set to emit 5000 particles per second, producing a dense and continuous rainfall effect. This value was later reduced to 2000 particles per second to improve overall performance.

A Shape Location module is added using a box shape. The size of the box is configured to be dependent on the system requirements, allowing flexible coverage of the scene.
Using the Initialise Particle module set Sprite size - random non-uniform.
The minimum X between 0.1 and 10, while the maximum Y range between 1 and 50.


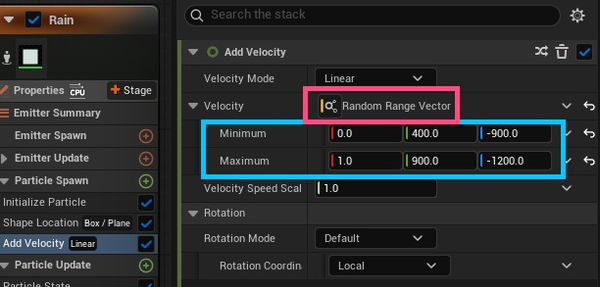
Add Velocity module.
Fix issue - Add Dependency module Solve Forces and Velocity dependency Velocity.
Velocity - Random Range Vector
Y axis ranging 400 to 900
Z axis ranging -900 to -1200
Producing downward motion with variation.
Sprite Render - Alignment - Velocity Aligned

Initialise Particle - Lifetime - 2.0 - Rain disappears naturally


Particle Update - add Collision so the rain collides with the floor.
Set particle radius scale to 0.1.
Add Kill Particles
select Has Collided from the drop-down search.


Particle Update - add Generate Collision Event.
Properties - Persistent IDs - TRUE
Splash Collision - Emitter
Niagara System - Rain
Splashes
Minimal emitter: splashes. Use an Event Handler with the source emitter set to rain and the event set to Collision Event.
Set Execution Mode to Spawned Particles and the spawn number to 10.
Receive Collision Event with values set from 0.2 to 1, and Y from 2 to 3.
Fix the issue on spawn.
Set Particle Spawn sprite mode to Random Non-Uniform.
Set velocity speed to 155.
Add Gravity in Particle Update using a Gravity Force and set Z to -380.
Set Sprite Renderer alignment to Velocity Aligned.
Set lifetime to 0.25.
